Showing posts with label beach theme. Show all posts

Wednesday, November 19, 2014

Doodlings becoming paintings...slowly

Happy Middle of the week peoples!!! I hope that everyone is staying safe and warm since Mother Nature seems to be having somewhat of a small tussle with Jack Frost. My thoughts and prayers are with those that have been really hit hard by this early winter weather.

If you have been coming to visit under the old Southern ooaks tree then you know that I'm currently working on some Christmas glass ornaments using some of my doodles as the designs. WOW...it does take some time to work with glass and acrylics as you have to let each layer dry completely before adding the next. Sooo, I'm doing something I don't normally do. I'm working on several at one time. Now...if my muse will just help me NOT get any of the designs mixed up we'll be good.

Here's the ones I have completed so far. Remember that these are doodles and follow along kind of a primitive cave man's drawings.


Each one has sand from Gulf Shores and tiny shells I found there as well. Before anyone thinks to report me to the sand police, I didn't go and dig up sand and bring it home. HeHe  This is sand that I have been collecting for several years from the shells I bring home and clean. You'd be amazed at the amount of sand in a shell, especially the olive shells. Think about it....remember all that sand in your car and trunk when you came to visit on vacation? Exactly!!!

Today I'm working on more ornies and my theme today seems to be sea turtles, sea horses, mermaids and surf boards. I'm really enjoying this project and I do believe after Christmas I'm going to buy several boxes of the glass balls and paint during the year.....have a set (a particular theme) for next year to offer. Maybe even do some for Halloween, Mardi Gras....ohhh the possibilites are endless, yes?

The ones for this year can be found at Beach Reflections LLC and the Blue Mermaid gift shop in Gulf Shores, AL. They have an online store as well. Please check them out.....buy from locals...it's a good thing to do.

Mermaid kisses and starfish wishes,
Regi

Sunday, November 9, 2014

Happy Sunday...look UP today and say "Thank you"

Happy Happy Sunday peoples. I hope that's it's a beautiful morning for you all. I know it is for me because I woke up. ^_^  That's always a good thing, yes? Matter of fact I woke up at 4ish and have been doing that a good bit here lately. It's hard for a night owl to suddenly want to be an early bird too. Confusing...very confusing indeed!!

To continue with the beach theme decoration projects that I started yesterday I thought with it being Sunday that my shell cross would be the perfect one to share.


Pretty yes? I stated yesterday that I'm making these beach themed projects where they can be enjoyed year round but YOU can always add any embellishment you like to make it be for that one special holiday. These would also make great gifts to give to that special friend that loves everything beachy. What could be more perfect as a gift....one made by you from gifts that Mother Nature donated.

I do my projects as what I teasingly call "The Starving artist way" because I try to repurpose items in doing them. You can of course change out the repurposed items for other items you may want to use. That can be a good thing for some....a chance to go to Hobby Lobby or Michaels. YEA!!! I have to be very, very careful when going there because if the mister EVER finds out what I actually pay for supplies I do buy....well...there's going to be some trouble. HEHE!!  Now, what were we talking bout...oh yes...here's what you'll need to get started with this very simple project.


28 Scallop shells
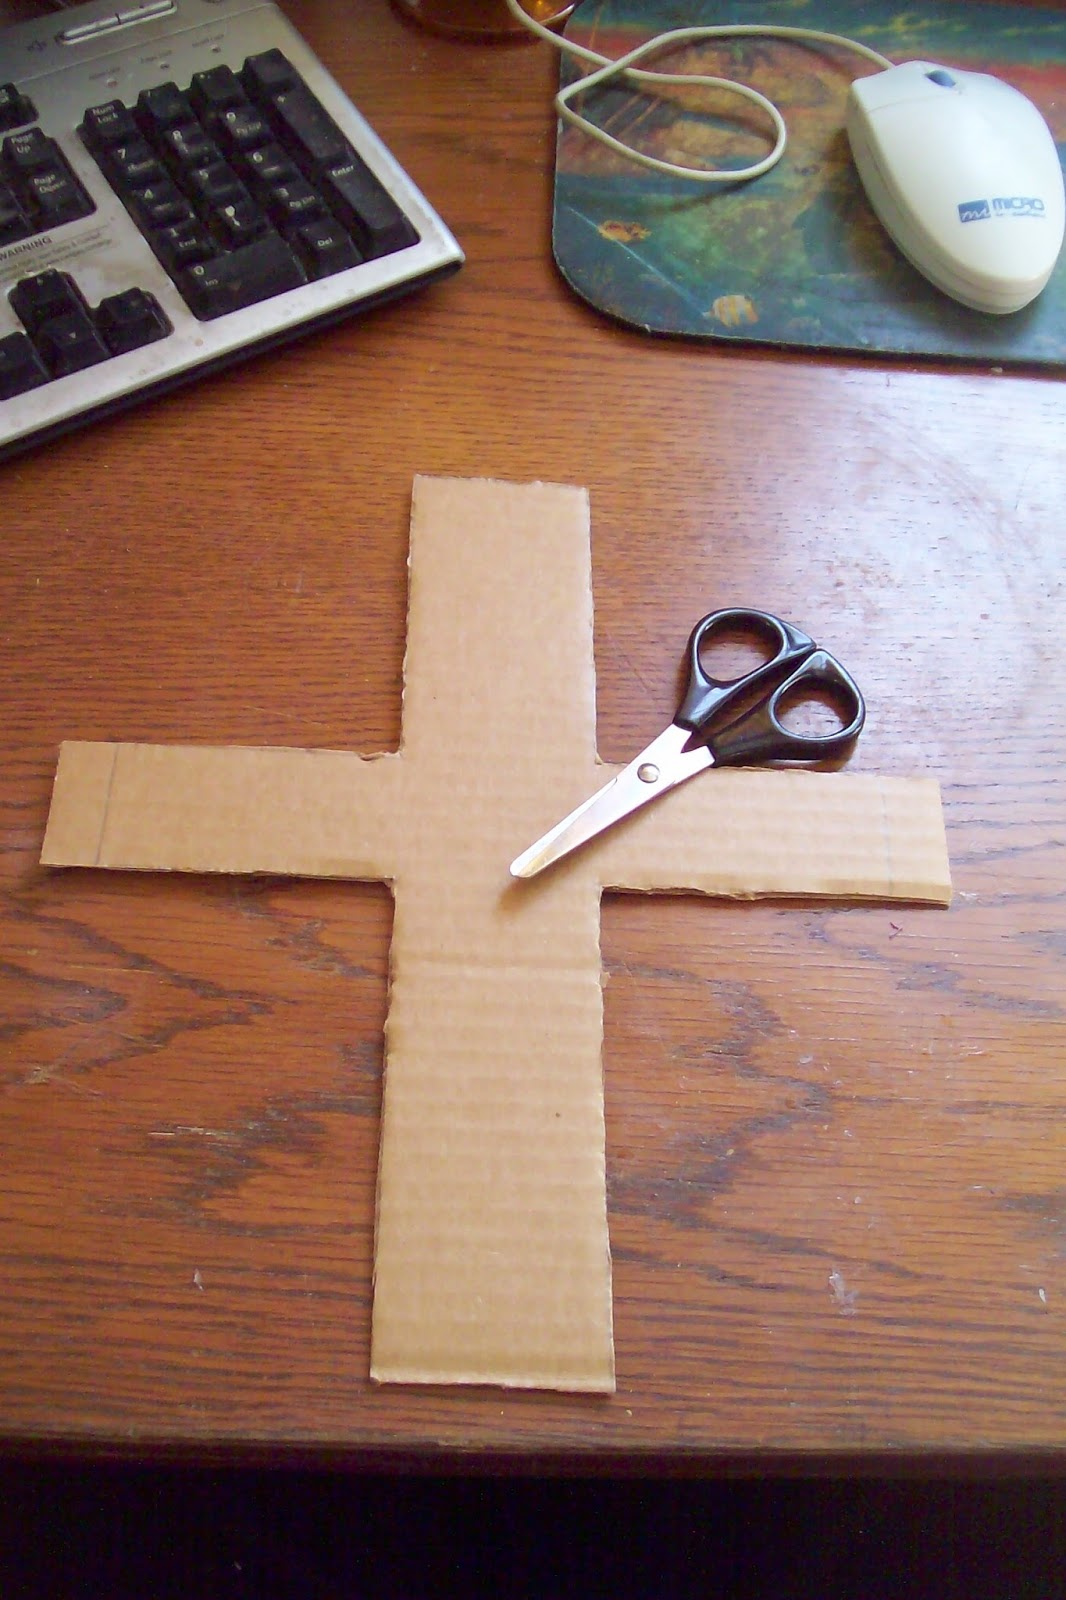
Piece of heavy cardboard
Piece of printed cardstock
Hot glue gun and glue sticks
School glue stick
Scissors
Twine
Ruler
Pencil

My cross measures 10 1/2 inch by 8 1/2 inch and is about 1 1/2 inch wide. You can of course make yours as big or as small as you like just keep in mind the size of shells that you are using cause you don't want the cardboard peeking out. This is also where a trip to a craft store could happen peoples if ya don't want to do it the starving artist way. (ie...buying an unpainted wooden cross) Take your piece of cardboard, ruler and pencil and draw your cross onto the cardboard. Then cut it out.


 My pretty piece of printed cardstock that will be my backing. This piece is embossed so it will give the cross base even more strength to hold the shells. (If you chose to use the wooden base then leave it natural or cover with a piece of felt.)


Now there are two ways you can do this next step. You can lay the cardboard cross down and trace around the edges onto the back of the printed cardstock, cut it out and then glue it on OR to make sure it's a perfect fit (for those of us that can't seem to trace or cut a straight line) simply glue the cardboard cross to the whole piece, wait for it to dry and then cut around the edges. HEY...I like to give several different ways to work peoples. I use the glue stick to do this as hot glue can make it a bit bumpy underneath.

Once you have the printed cardstock glued onto the cardboard then you're ready for the next step.  Let's put the twine hanger on. Doing it now makes it so much easier then later...believe me....trial and error peoples, learn from my errors. Poke two holes in the top of the cross base and then run your twine through each hole and bringing them through to the front of base. Tie at least two knots and then hot glue it down to the board. This gives it added strength. (If you are using the wooden base then make sure you buy one of the frame hanging kits so you have a way to hang up when completed and do add it before adding any shells. Don't want to crack any of those lil beauties)
Next we are going to place the shells on the cross base so that we will know exactly how to space them before gluing them on permanently.  Makes things so so sooo much easier. Once you have them spaced the way you want them then it's time to start making some marking lines.
 Marking lines make sure that you glue shells where they need to be. It's a bit time consuming but well worth the extra effort in making sure your cross looks uniform. Simply lay your shells over to the side as close to how you had them on the cross and picking each one back up place on cross and mark where your glue line needs to be. You will put glue there as well as a small dab on the inside top of shell to attach to other shell before it. (The first shell will simply be attached to the cross tips. Yes...start at the top and work your way down until you come to the middle. Turn cross and do the same for the other three sides...meeting in the middle.)
 Here's what the middle will look like once you have all sides of the cross complete. Take four smaller scallops and glue them as shown in picture. Then take a shell large enough to cover hole and glue that to the four shells. Add a smaller shell on top of that and your cross is complete. This is where you could add embellishments if you desired. I love it just the way it is, so that I can hang it year round.

I hope you will take some of your scallop shells found on those beach walks and make a cross for a friend or even for yourself. Of course, you can use whatever shells you like, just play around with them. Have FUN!!

Until next time...........Blessings,
Regi

Tomorrow we're going to make a oyster shell angel. Come back and learn how. ^_^

Saturday, November 8, 2014

Let's do something with shells!!!!

Happy Saturday morning peoples!!! Brrrrrrr.....Mother Nature is really enjoying herself with us folks here on the coast in Alabama. She's making us wear socks with our flip flops...hehehe.  It's 47 right now and to us that's freakin frrrreezing peoples. That's alright though cause it means our humidity is low and that's always a good thing. ^_^

I've been asked to teach a few craft classes this fall and winter at Beach Reflections and the Blue Mermaid, the little gift shop I help out at so I'm going to let YOU be my guinea creatures (umm didn't want to call anyone a pig...hehe) So let me know what you think and if you have any suggestions on classes that I could teach...well...speak up peoples...let me know!!

Living at the beach means lots and lots of beach walks, which means lots and lots of shells being taken home. I thought a few projects using those shells and making some keepsakes would be a good thing to do. Also, since Christmas is getting closer and I know AGAIN with us living at the beach that a good bit of folks like to use a beach theme for their decorating. Heck fire...even those that don't live here but still have a love of the beach like to use shells too, yes?


Let's get started with the first project I want to show you. This is what I call a "Mermaid's Kissing Ball". Everyone needs a mermaid kissing ball or two or three. Here's what you'll need to complete this project:

Glass ornament ball
shells (of course)
hot glue gun and glue sticks
toilet tissue tube
hemp or twine
Scrap Paper
Scissors

Yes peoples, you saw one item correctly.....a toilet tissue holder. If you don't like repurposing them then you can make the base for this project out of heavy cardstock. I LIKE to repurpose items.....keeps them out of our landfills and saves me money. ^_^  (remember....starving artist here most of the time)


This is going to be the base for the kissing ball so you need to decide how tall you want it to be. Decide...then cut it down. You need to make a smooth straight cut so use a ruler if you need to and don't discard the other end. You might want to use that too but I'll explain a little further down in the directions.


Next step is to take the hemp or twine and wrap it around the tube. Be very careful cause we all know how HOT hot glue can get. Start with a small bead of glue and attach twine then run a small line close to the bottom edge and start wrapping. Run a small line of glue and then wrap...small line of glue and then wrap. Okay...I think ya get the point!! Once you have wrapped twine all the way to the top run a small bead of glue on the inside of the tube and attached the end there. It's going to be hidden so ya don't have to get fancy.


Take the tube and place on a sheet of scrap paper and trace around it. I know the twine is there but if you hold your pencil straight up then you will be able to trace a perfect circle. Take the cut out paper circle and place on top of the beadbacking and then cut out the circle that we are going to glue to the base. Makes it look finished and neat. Run a thin line of hot glue on the base of the tube then simply sit the tube down and gently press. If you need to do any trimming then wait until glue is dry and then just trim. (it's alright, we all have to do that sometimes)

Before I go any further I know some might be asking "Regi...what is beadbacking?"  OMGOSH...I can't believe you had to ask cause it's a wonderful product that every crafter should have on hand. It has a thickness that works wonders not just for making base bottoms like we are here but can be used for so many projects. Flat bead work, embroidery, canvas for drawing, painting or stenciling and I love the fact that you can not only use glue on it but you can sew on it too. Like I said.....great product to have on hand!!


Now that the base is finished let's start the FUN part shall we. Using those lovely shells you have. For my kissing ball I used dog whelk shells. Just love their texture!! For this I used the other end of the tube (see why I told ya not to discard) to hold the ball while gluing shells on. I didn't want to get glue on the finished base peoples...I know how messy I can be..hehe. DO NOT glue the ball to base until project is completely finished.  Taking your pencil once the ball is sitting on the tube, mark around the top of the tube (bottom of the ball) so that you will know where to stop adding shells. You can of course add all around but really no need to since we are going to be gluing the ball to the base once finished.  Look through your shells and pick out ones that will fit around the top (like in the second photo). Once you have that first roll picked out then it's time to glue. Put a good dab on the ball and then place shell on top and hold for just a second or two. Do this til your first roll is complete. Next, dig through those shells and find ones that will fit and look nice glued in between the first roll (as in third picture) Start gluing and repeating this step until you have glued down to your marking line at the top of the base.   Once all rolls are done simply take some smaller shells and fill in any gaps. Now....you can glue the ball to your finished base.


To add the hemp bow to the top I ran a piece of hemp under the wire that would normally be used to hang the ornament. I then took about 2 arm lengths (that's how I measure peoples. HEY...it works for me. An arms length measurement is taking the end of the hemp in one hand and pulling your arm straight out to your side, shoulder height, and the other end will be at your chin.) Take this and letting about 2 inches fall down as an end tail, start making a bow. I just make this kind by wrapping the hemp back and forth from one side to the other and holding it firmly in the middle as I do this. Remember to leave about 2 inches on the other end as well. Take a small piece of hemp and tie in the middle of the bow as this will make it easier to handle when adding to the ball. Take bow and lay on top of hemp you run under wire and knot several times and then trim those ends to match bow ends. Now is when you can use one of your broken shells if you want to. I LOVE my broken shells!! I glued one to the middle of bow just to make it even prettier.

Now...you have a Mermaid's Kissing ball. Make several to place on a mantle or even to use as a centerpiece on the table in the foyer or dining room.  I kept this one simple so that it can be used  year round but you can add so many different embellishments to give it what ever holiday look you want. You could also use different size glass or wooden candle holders to give them a different look.

I hope you will make your own Mermaid Kissing ball now and I also hope you enjoyed this "How to". I love sharing ideas and projects and I hope that it's one that will get some interest for one of the classes I will be offering at the shop. ^_^

Until the next time...........Hugs,
Regi


Tomorrow I'll be showing "How to" make a shell cross!!!

Friday, June 6, 2014

Take a moment....to remember them!!

D-Day is the military lingo for when an operation or event will take place. Most think of D-Day as one event, Operation Overlord that happened on June 6th, 1944. The largest amphibious military operation in history. The heroism and bravery displayed by troops from the Allied countries on this D-Day should always be remembered!!!

Happy Friday to YOU and thank you for stopping by. I hope today is just the beginning of an adventurous weekend. ^_^   Mine will be getting off to a slow start since the Chazman decided he just couldn't go to sleep last night (yes...he is a night owl. can't imagine whereeee he gets that from..hehe) and decided to sit up until 3:30ish and play one of his strategy games. So being the nice, sweet, caring momma that I am....I'm going to let him sleep until 9ish and then his hiney is getting up so we can be off exploring.

Since I have some time before I drag, pull, use ice water get him up, I'm going to work on some more necklaces. These are going to be mermaid tails. I just love the broken whelks and conchs that show their inside swirls.


Ohhhhh....I forgot to show you what I made the other day for *ahemmm* myself. Well....I like to wear pretties too ya know. I like wearing the top and sides of my hair back and letting it hang down. I use to use scrunches and now I use bobby pins. So much you can do with bobby pins but they are soooo boring and plain. Sooooo, I made some non boring ones and got so many compliments on them. I'm thinking of making more sets to put in my Etsy shop.

Yeppers...I even made some matching earrings.

Yesterday I spent time going through some new shells (thank you Diane) and came up with some new designs. I was able to get four done and I LOVE them all. My muse was so so happy happy happy yesterday.


I used natural polished hemp rope (I like the polished because it doesn't scratch like regular hemp can), a scallop shell for the base. Oliver shells and a broken conch for the sunflower or would that be olive flower, hehe!! Coquina shell for the butterfly. The rope part is 19 inches (yeah, don't know what happen to that extra inch) and has bone beads and polished amber quartz stone beads. Did you know that amber quartz represents warmth and brings out creativity and also is believed to bring relief from burnout and give a joyful outlook? I love using healing stones!!


This beauty is 22 inches long and is of course made from the polished hemp. I used a scallop as the base with a large piece of barnacle for the focal. There is a natural piece of coral poking out from the barnacle with two polished rose quartz beads and a tumble quartz stone.On the rope are more polished rose quartz beads. Rose quartz is believed to heal one's heart from pain and disappointment.


Now here's one that I would put in my mermaid inspired pieces. I LOVE it!! I think of bubbles when I see it because of the circles that are in the design. All created by Mother Nature too. I do not paint my shells...I just use as the gift they were given to me as. This one is on a 18 inch hemp rope. The shell medallion is about 4 inches long, that's from the top of the shell to the bottom of the wee tiny vial. A scallop shell was used as the base. On top are a piece of coral, kittens paw, moon shell and another scallop shell. Don't ya just love those natural circles on it? Me too.The vial holds sand, tiny auger shell and tiny conch from Gulf Shores. I used tiny rose colored Swarovski crystals and polished clear quartz stones on the rope. Clear quartz is believed to bring clarity to your communication and amplify your thoughts, which may assist you by stimulating clearer thinking. We can all use that....clearing thinking!!


Here's one of my whimsical ones using one of my handmade manatee clay charms. They have such sweet lil faces...ya just want to pinch em. (ya know...like Grandma use to do when she hadn't seen ya for so long..hehe) This one is 20 inches long. That measurement, on all of my necklace, is the actual length of the rope part....the medallion will add more length to the whole piece.....of course. A scallop is the base with a kitten paw and moon shell attached. A tiny scallop shell fans out on the top. Simple but pretty black acrylic beads and Tibetan beads were used on the rope.

I had FUN yesterday and plan on having even more today with designing. I hope that your day is filled with everything you love to do. OK...well....perhaps you can't do everything you love to do but at least try and pick one.

Until next time............Hugs,
Regi

Tuesday, January 21, 2014

Blustery Tuesday indeed!!!

Goodness....it truly is a blustery day. I have little fingers knocking on my big picture window and arms waving at me from the ancient ones outside.  Not real ones of course but those tiny little fingers (branches) on the Kumquat tree and the long strong branches on the big trees. I love to see the branches swaying back and forth....like they are doing a dance and begging me to come and join in. Yes....yes....my imagination is in full swing today!!!

Yesterday and early this morning, I worked on some shell medallions to make some more necklaces with. I'm so loving going through my shells found on our beach walkabouts. As ya'll already know, I really love the broken ones best. I guess part of it is because with my VERY vivid imagination I see so much more than a little broken shell. I feel so BLESSED to have been given this gift even if to some it makes me seem a bit weird/different/strange but like my son tells me "Mom...you're different with a side of AWEsome".  I can live with that. ^_^

If you look closely on your next beach walk, ya just might find some of the wing oyster shells that Mother Nature washes up on shore. They don't look like much to most but WOW....put them together and you will be amazed at what you will see. Like this little grouping.......


The big shell is a scallop shell. Lovely colors in this one. Those tiny shells (the dark ones and the pearl) are broken wing oyster shells. I did not break any of these and look at how perfectly they fit together and once together....do you see it? A mermaid tail!!!


Scallop shells come in a variety of colors....from light to dark. I thought this dark one would make a great background for more wing oyster shells. Stacked on top of one another they almost look like a pretty flower. The bead is a moonstone but to me, I think it looks like a shiny untouched pearl that would surely be hidden in a mermaid's treasure box.


This lil broken beauty is what's left of a moon shell. Ohhh the stories it could tell us if only we could hear. The tiny shell poking out like a hankie in a pocket is called a kitten's paw.


Can ya tell I really like the scallop shells? HeHe  Ya have to admit that they do make for a pretty background piece. This one is not really as dark as in the photo. It is more of a light grey. The broken piece in the middle I believe is part of a murex shell. The Chazman thought it looked like an old fashioned key of some sort. Perhaps the key to a mermaid's treasure box? Indeed!!

Now I don't always use just broken shells. The whole ones we find are lovely too and I found some that were just the right size for a necklace or two.


Two scallop shells in the same color hues....perfect!! The bigger one had a few tiny holes so adding the smaller one was....well.....just what it needed, yes?  The pretty butterfly that has landed on top are actually two coquina shells. Now here is one of the times folks will think I'm a bit looney. Yes, yes I know you already think that....but at least it's with a side of awesome, ri iight??  I know you have seen these little shells, the ones that come in on the waves and immediately try and bury themselves. I would took seeing how they are apparently a favorite snack for the little sandpipers in the spring and summer and the plovers in the winter. Now the reason I said that some will think I'm a bit looney is that I will NOT take any of these pretty shells unless they are open and empty. I figure once they are open that they have served their purpose that Mother Nature had intended and are ready for a new adventure.....as jewelry!!!


This beauty is a fighting conch shell. It measures about 2 1/2 inches. For some reason I saw pearls with this one and as you can tell that's what I used. These are the last of my vintage pearls from a 60+ year old wedding veil I had.

Now...I bet ya can guess just what I will be doing the rest of the morning. Turning these pretties into necklaces. After that I will be making another necklace holder because my first one has filled up fast!!

Thank you soooo much for stopping by to visit. I do hope that you will come again and often. Bring some friends next time....the more the merrier, yes?

Until next time...............keep a shell in your pocket and some sand between your toes.

Regi

Friday, January 10, 2014

Oysters, oysters everywhere!!

Good FRIDAY morning to all. So happy you stopped by to sit under the old Southern ooaks tree for a bit.  Be careful and don't step on all the oyster shells lying about. Not that you could really hurt them...they are tough little shells but they might put an ouchie on that footsie. ^_^

While digging through my shell stash the other day, I found some oyster shells that I had totally forgotten I had. I LOVE oyster shells and I have to admit that they kinda remind me of well ummmmm ME. Ya know, kinda rough and weathered on the outside but smooth and pretty on the inside. HeHe Well...that's how I feel!!

I made some cute little mermies the other day but in looking at them I thought "Hmmmmm, they need something else", yes, that was the thought I had and I did something about it. With the help of an oyster shell I turned them into cute little ring holders.


Cute, ri iight??  Mother Natures perfect little holder, well, with a tad bit of help from muah!! The lil mermaid face one has already been claimed. HeHe  I will be putting the other two in my Etsy shop. I plan on making several more of these plus when I get some new oyster shells and some are big enough, I'm going to be making some soap dishes. I'm sure my muse will probably come up with a few other items too.

Until next time...........Hugs,
Regi