Showing posts with label how to. Show all posts

Sunday, March 1, 2015

WHOA....it's WHAT month already?

Peoples.....can ya believe it's March already? Where is all the time going to? I feel as though I'm in a time warp of some kind because I know it surely can't really be March already. ^_^

Well, actually I do know that today is March 1st because I'm working on the ornaments and goodies that will be going up at the grill tomorrow. If you haven't been visiting in a while or this is your first visit under the old Southern ooak tree then you probably don't know what the grill is, do you? It's a Funky, junky Redneck dive that I'm working at. BAHAHAHA!!! It's where all the locals go to eat and I can tell ya from experience that the food is AWESOME. The name of the grill I'm working at is called Fish River Grill #2 located here in Foley. There is also a Fish River Grill #1 which is located in Fairhope ( that's called the Funky, junky Dive) and one located in Gulf Shores that is Fish River Grill #3 (the Funky, junky Hifalutin joint). If you're ever in the area come and visit and enjoy some true Southern hospitality and cooking!! Now, back on track to what I'm making and why. HEY...ya'll know I get very easily distracted. We have a Holiday tree at #2 and I get to decorate it....YEA me!!! January we left it as the Christmas tree (it should always be Christmas, at least in peoples actions and thoughts) and last month is was of course turned into a Mardi Gras tree. This month it's going to be a St. Patrick's day tree.

The first item I'm making is a cute paper banner that I plan on hanging on the front side of the register counter. I love playing with paper. It's something that most of us have on hand and you can do so much with it. I thought perhaps YOU might like to make one of the banners too....so come and follow along.


Supplies Needed:


Pencil
Ruler
Scissors
Cardstock (White and tan)
Pretty paper or stamps and ink
Vintage image map of Ireland
Vintage image of sheet music
Twine
Brads-small
Glue (I used Elmer's school glue stick)
Hole punch
Thick doll needle or dentist scraping tool
Green glitter (I use glitter fast dry fingernail polish)


First thing is to decide how you want your banner to look. I love scoping out "How To" post from other bloggers and found this one that gave me the inspiration to make my own banner. The blog is called Lil Luna (all things good) and if you would like to see her post, where I found my inspiration, just click HERE


I like the pointed flag look so that's what I'm using. I measured out on cardstock for each size that I need for a pattern. The larger piece I will use the tan cardstock to print off  the vintage sheet music "Irish Eyes are Smiling" (which I found on Pinterest) and the smaller one I will use the white cardstock for the vintage map of Ireland. (also found on Pinterest) Print out three of each and once printed, simply flip over and trace the appropriate pattern on the back and cut out. 

I looked around for some cute ideas for shamrocks. No worries if you can't draw a shamrock because we are going to make them the simple way...out of hearts!!  We are...I kid ya not.  I didn't have to look far for my inspiration in those either because I thought that the ones Luna made were perfect. Now if you have stamps and love to use them then this would be the time. I don't have any stamps (as the mister would kill me if I added any more craft items to my already overflowing inventory...hehe) If you are stamping then do both sides (you will understand why in a minute or two) Since I'm using the pretty ones Luna had I need something for the back side, so I'm  using a pretty printed piece of scrapbook paper that I have on hand. I printed off Luna's hearts (we need 15 of them) and then glued the papers together. (printed sides facing outwards) So much easier to do it this way so that when you cut the hearts out the backing will line up perfect. Here's what you should have at this point.


Take one of the music sheets and glue one of the maps pieces to the top of it. I think I will place mine almost in the center as I want the name of the music and the first line of bar notes to show. Now it's time to put together a shamrock. You will need 3 of your hearts to make one shamrock. With the prettiest side facing up you are going to gently crease it in the middle. (this is why both sides need to look nice)  

See the white poking out? This is what happens when you don't glue your two pieces of paper together BEFORE cutting out. HEHE (I did clip and make neat before putting together)

My shamrocks are going to be placed in different areas on top of the maps. Left side, center and right side....just to give it an off kilter balanced look. I'm going to place one where I want to attached it and push my dental tool (or large doll needle) through the banner where I will be using one of the brads. Don't put the brad in just yet because we need to glue our shamrock to the map. The first leaf you will place glue on the right side of the heart and place with the tip just touching the hole we made for the brad and press down. Take the second leaf and place glue on the left side and do the same as leaf one. Take the third leaf and glue the right side and follow as you did the first and second one. All three tips should be facing the brad hole. Now, insert the brad and close on the back side of banner. If you want to add some glitter this is the time to do it. I use fast drying fingernail glitter polish for my paper projects and it works great. Just sayin....just a thought of another way to do something using glitter. We all LOVE glitter, yes?


Now, we are going to make two shamrocks that we will place on either side of the center flag on our banner. You should already have the shamrock cut out but you will also need to cut out, using cardstock, a circle so that we can attach the leaves together as well as have a base to pull our twine through. 


This is showing you the back and front of circles. Using the dental tool (or large doll needle) poke a hole in the center of the circle. This is where we will be placing the brad to hold it all together.  On either side of that hole you will need to cut a slit. Don't cut to close to edges, you just need enough of a slit to guide the twine through. Punch holes in each leaf at the tip too and not to close to the edge. Hold the brad and slide each leaf onto it and then slide the circle on. Close brad.


This is what your shamrock will look like once you have all leaves attached to circle. You can use that glitter now. I know ya want to!!!! HEHE

Now all we have to do is using hole punch,  punch holes on each side of the flags so that we can run our twine through. I use myself as a twine measurer. HEY...it works peoples!! I take twine in hand and run out until I have enough out to reach chin holding arm straight out level to shoulder. I'm using three arm lengths. 


You should have a banner like this now. YEA!!! Where are you going to put your banner? It's going to look awesome no matter where you hang it. I'm so glad that you followed along and made one for yourself. 

It's on to making some chenille mischief makers for the tree now. WHAT??? Ya don't know what a mischief maker is? It's one of the wee peoples....leprechauns!!

Until next time...............get up and do something,

Regi

Monday, November 10, 2014

It's Monday and time for an angel to come visit!!

Happy Monday peoples. I can't say happy good morning because I kinda let the morning slip on pass me. It's lunchtime already. Geez...someone grab Father Time by the coat tails and slow him down, will ya? ^_^

Are you following along with the seashell projects? I hope you are. I would so hate to think that I have been talking to myself here. HEHE  No matter really though cause (looking around) I do it often....talk AND answer myself. It's nice though if YOU are following along. I would love to see some photos of any that you have made from my How To's. Please!!! Purty please!!


Yesterday I promised that we would make an angel ornament today and boy is this one easy project to do. The hardest part is where ya have to go and find the shells and then leave the beach. I mean, isn't it so hard to walk AWAY from the beach. I know it's hard for me and I can go anytime I want. I'm so easily distracted..what were we talking about....oh....yes....a project. What you will need for this project as seen in the above image are the following:

Oyster shell
Cockle shells (2)
Moon shell (small)
Wire (20 gauge)
Beads (4-5)
Moss
Hot glue gun and glue sticks
Twine

So easy to do. Make sure that you clean and dry all your shells before putting together if you haven't already done so. Take the oyster shell and place either side up that you want to use. I really liked the outside of this one but if the inside is prettier, you might want to use that instead. It's your angel!! Place the cockle shells sideways on either side at the top and then place moon shell turned sideways in between cockle shells. The cockle shells are going to be her wings and the moon shell her face. Doing this lets you see where to place the shells before you start to glue anything down permanently.

Finished project. 

Cut a piece of twine about 4 inches long and knot the cut ends together. I normally do two knots to make it strong. Take your glue gun and place a line of glue on the back side at the top of the oyster shell and lay twine over it. This will be the hanger so make sure it has enough length to add a wire hanger or even enough to use the twine as the hanger.

Next, taking your glue gun you want to add a dab of glue to left top side of the oyster shell and attach one of the cockle shells. Turn the cockle shell sideways so it looks like a wing. Take the moon shell and place sideways next to the now attached wing so that you will know exactly where to glue the other wing and leave enough room to add moon shell afterwards. Now, do the same thing to the right top side to add cockle shell. Once that's done add dab of glue in between the cockle shells and place moon shell sideways.


Cut about a three inch piece of 20 gauge wire and thread about 4-5 small beads on to it. This is going to be her halo. Once beads are on wire, take wire and place around pointer finger and cross wire over in back and then twist until you have a small stem coming down. Don't twist to tight on finger because you don't want to be part of the halo, do you?? ^_^  To keep beads from moving add a tiny dab of glue to both ends or you can fill up the halo part with beads. Remember, it's YOUR angel!!

Take some of the moss and add to the top of the moon shell. This is her hair. Add as much or as little as you want. After moss is attached add a dab of glue to the back of moon shell and attach the halo stem. I normally put a small dab on to the stem as well for add support and strength.

You angel is completed. See, I told ya it was an easy project. A beautiful ornament made by you using gifts from Mother Nature. What could be better? Perhaps making several and giving as gifts? Or perhaps making several to hang on your tree? You know how to make them now  so make several and have FUN!!!

Until next time............spread those wings,
Regi


Sunday, November 9, 2014

Happy Sunday...look UP today and say "Thank you"

Happy Happy Sunday peoples. I hope that's it's a beautiful morning for you all. I know it is for me because I woke up. ^_^  That's always a good thing, yes? Matter of fact I woke up at 4ish and have been doing that a good bit here lately. It's hard for a night owl to suddenly want to be an early bird too. Confusing...very confusing indeed!!

To continue with the beach theme decoration projects that I started yesterday I thought with it being Sunday that my shell cross would be the perfect one to share.


Pretty yes? I stated yesterday that I'm making these beach themed projects where they can be enjoyed year round but YOU can always add any embellishment you like to make it be for that one special holiday. These would also make great gifts to give to that special friend that loves everything beachy. What could be more perfect as a gift....one made by you from gifts that Mother Nature donated.

I do my projects as what I teasingly call "The Starving artist way" because I try to repurpose items in doing them. You can of course change out the repurposed items for other items you may want to use. That can be a good thing for some....a chance to go to Hobby Lobby or Michaels. YEA!!! I have to be very, very careful when going there because if the mister EVER finds out what I actually pay for supplies I do buy....well...there's going to be some trouble. HEHE!!  Now, what were we talking bout...oh yes...here's what you'll need to get started with this very simple project.


28 Scallop shells
Piece of heavy cardboard
Piece of printed cardstock
Hot glue gun and glue sticks
School glue stick
Scissors
Twine
Ruler
Pencil

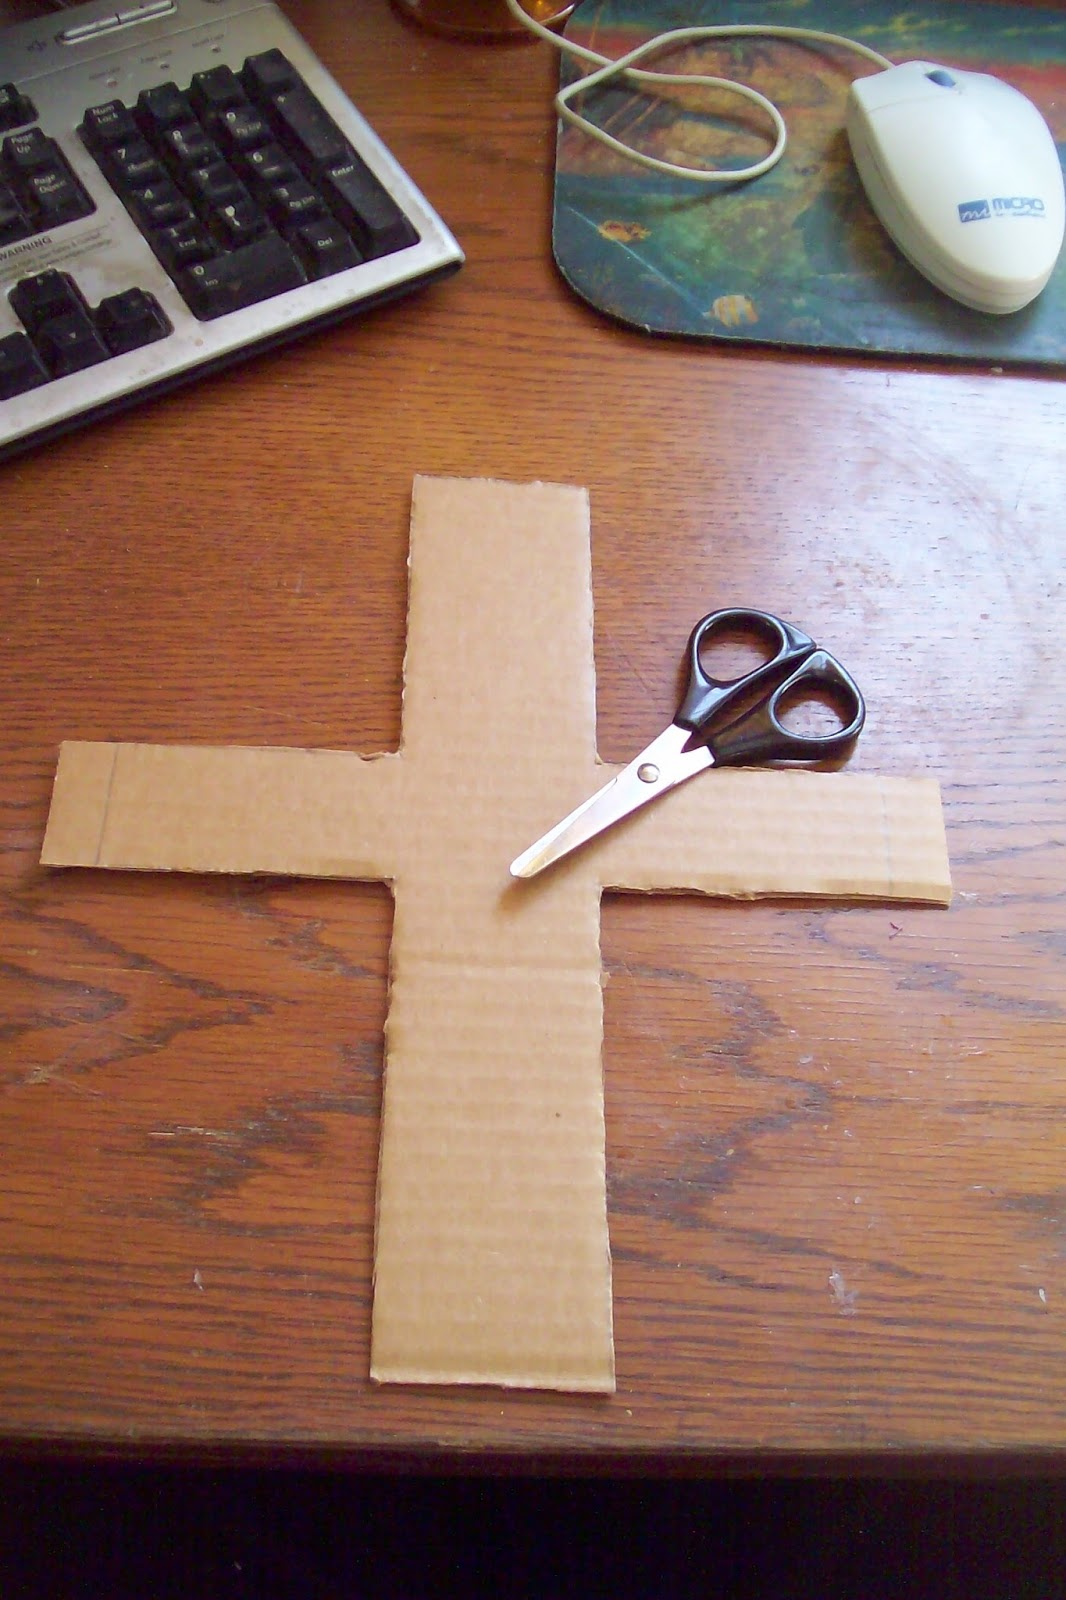
My cross measures 10 1/2 inch by 8 1/2 inch and is about 1 1/2 inch wide. You can of course make yours as big or as small as you like just keep in mind the size of shells that you are using cause you don't want the cardboard peeking out. This is also where a trip to a craft store could happen peoples if ya don't want to do it the starving artist way. (ie...buying an unpainted wooden cross) Take your piece of cardboard, ruler and pencil and draw your cross onto the cardboard. Then cut it out.


 My pretty piece of printed cardstock that will be my backing. This piece is embossed so it will give the cross base even more strength to hold the shells. (If you chose to use the wooden base then leave it natural or cover with a piece of felt.)


Now there are two ways you can do this next step. You can lay the cardboard cross down and trace around the edges onto the back of the printed cardstock, cut it out and then glue it on OR to make sure it's a perfect fit (for those of us that can't seem to trace or cut a straight line) simply glue the cardboard cross to the whole piece, wait for it to dry and then cut around the edges. HEY...I like to give several different ways to work peoples. I use the glue stick to do this as hot glue can make it a bit bumpy underneath.

Once you have the printed cardstock glued onto the cardboard then you're ready for the next step.  Let's put the twine hanger on. Doing it now makes it so much easier then later...believe me....trial and error peoples, learn from my errors. Poke two holes in the top of the cross base and then run your twine through each hole and bringing them through to the front of base. Tie at least two knots and then hot glue it down to the board. This gives it added strength. (If you are using the wooden base then make sure you buy one of the frame hanging kits so you have a way to hang up when completed and do add it before adding any shells. Don't want to crack any of those lil beauties)
Next we are going to place the shells on the cross base so that we will know exactly how to space them before gluing them on permanently.  Makes things so so sooo much easier. Once you have them spaced the way you want them then it's time to start making some marking lines.
 Marking lines make sure that you glue shells where they need to be. It's a bit time consuming but well worth the extra effort in making sure your cross looks uniform. Simply lay your shells over to the side as close to how you had them on the cross and picking each one back up place on cross and mark where your glue line needs to be. You will put glue there as well as a small dab on the inside top of shell to attach to other shell before it. (The first shell will simply be attached to the cross tips. Yes...start at the top and work your way down until you come to the middle. Turn cross and do the same for the other three sides...meeting in the middle.)
 Here's what the middle will look like once you have all sides of the cross complete. Take four smaller scallops and glue them as shown in picture. Then take a shell large enough to cover hole and glue that to the four shells. Add a smaller shell on top of that and your cross is complete. This is where you could add embellishments if you desired. I love it just the way it is, so that I can hang it year round.

I hope you will take some of your scallop shells found on those beach walks and make a cross for a friend or even for yourself. Of course, you can use whatever shells you like, just play around with them. Have FUN!!

Until next time...........Blessings,
Regi

Tomorrow we're going to make a oyster shell angel. Come back and learn how. ^_^

Saturday, November 8, 2014

Let's do something with shells!!!!

Happy Saturday morning peoples!!! Brrrrrrr.....Mother Nature is really enjoying herself with us folks here on the coast in Alabama. She's making us wear socks with our flip flops...hehehe.  It's 47 right now and to us that's freakin frrrreezing peoples. That's alright though cause it means our humidity is low and that's always a good thing. ^_^

I've been asked to teach a few craft classes this fall and winter at Beach Reflections and the Blue Mermaid, the little gift shop I help out at so I'm going to let YOU be my guinea creatures (umm didn't want to call anyone a pig...hehe) So let me know what you think and if you have any suggestions on classes that I could teach...well...speak up peoples...let me know!!

Living at the beach means lots and lots of beach walks, which means lots and lots of shells being taken home. I thought a few projects using those shells and making some keepsakes would be a good thing to do. Also, since Christmas is getting closer and I know AGAIN with us living at the beach that a good bit of folks like to use a beach theme for their decorating. Heck fire...even those that don't live here but still have a love of the beach like to use shells too, yes?


Let's get started with the first project I want to show you. This is what I call a "Mermaid's Kissing Ball". Everyone needs a mermaid kissing ball or two or three. Here's what you'll need to complete this project:

Glass ornament ball
shells (of course)
hot glue gun and glue sticks
toilet tissue tube
hemp or twine
Scrap Paper
Scissors

Yes peoples, you saw one item correctly.....a toilet tissue holder. If you don't like repurposing them then you can make the base for this project out of heavy cardstock. I LIKE to repurpose items.....keeps them out of our landfills and saves me money. ^_^  (remember....starving artist here most of the time)


This is going to be the base for the kissing ball so you need to decide how tall you want it to be. Decide...then cut it down. You need to make a smooth straight cut so use a ruler if you need to and don't discard the other end. You might want to use that too but I'll explain a little further down in the directions.


Next step is to take the hemp or twine and wrap it around the tube. Be very careful cause we all know how HOT hot glue can get. Start with a small bead of glue and attach twine then run a small line close to the bottom edge and start wrapping. Run a small line of glue and then wrap...small line of glue and then wrap. Okay...I think ya get the point!! Once you have wrapped twine all the way to the top run a small bead of glue on the inside of the tube and attached the end there. It's going to be hidden so ya don't have to get fancy.


Take the tube and place on a sheet of scrap paper and trace around it. I know the twine is there but if you hold your pencil straight up then you will be able to trace a perfect circle. Take the cut out paper circle and place on top of the beadbacking and then cut out the circle that we are going to glue to the base. Makes it look finished and neat. Run a thin line of hot glue on the base of the tube then simply sit the tube down and gently press. If you need to do any trimming then wait until glue is dry and then just trim. (it's alright, we all have to do that sometimes)

Before I go any further I know some might be asking "Regi...what is beadbacking?"  OMGOSH...I can't believe you had to ask cause it's a wonderful product that every crafter should have on hand. It has a thickness that works wonders not just for making base bottoms like we are here but can be used for so many projects. Flat bead work, embroidery, canvas for drawing, painting or stenciling and I love the fact that you can not only use glue on it but you can sew on it too. Like I said.....great product to have on hand!!


Now that the base is finished let's start the FUN part shall we. Using those lovely shells you have. For my kissing ball I used dog whelk shells. Just love their texture!! For this I used the other end of the tube (see why I told ya not to discard) to hold the ball while gluing shells on. I didn't want to get glue on the finished base peoples...I know how messy I can be..hehe. DO NOT glue the ball to base until project is completely finished.  Taking your pencil once the ball is sitting on the tube, mark around the top of the tube (bottom of the ball) so that you will know where to stop adding shells. You can of course add all around but really no need to since we are going to be gluing the ball to the base once finished.  Look through your shells and pick out ones that will fit around the top (like in the second photo). Once you have that first roll picked out then it's time to glue. Put a good dab on the ball and then place shell on top and hold for just a second or two. Do this til your first roll is complete. Next, dig through those shells and find ones that will fit and look nice glued in between the first roll (as in third picture) Start gluing and repeating this step until you have glued down to your marking line at the top of the base.   Once all rolls are done simply take some smaller shells and fill in any gaps. Now....you can glue the ball to your finished base.


To add the hemp bow to the top I ran a piece of hemp under the wire that would normally be used to hang the ornament. I then took about 2 arm lengths (that's how I measure peoples. HEY...it works for me. An arms length measurement is taking the end of the hemp in one hand and pulling your arm straight out to your side, shoulder height, and the other end will be at your chin.) Take this and letting about 2 inches fall down as an end tail, start making a bow. I just make this kind by wrapping the hemp back and forth from one side to the other and holding it firmly in the middle as I do this. Remember to leave about 2 inches on the other end as well. Take a small piece of hemp and tie in the middle of the bow as this will make it easier to handle when adding to the ball. Take bow and lay on top of hemp you run under wire and knot several times and then trim those ends to match bow ends. Now is when you can use one of your broken shells if you want to. I LOVE my broken shells!! I glued one to the middle of bow just to make it even prettier.

Now...you have a Mermaid's Kissing ball. Make several to place on a mantle or even to use as a centerpiece on the table in the foyer or dining room.  I kept this one simple so that it can be used  year round but you can add so many different embellishments to give it what ever holiday look you want. You could also use different size glass or wooden candle holders to give them a different look.

I hope you will make your own Mermaid Kissing ball now and I also hope you enjoyed this "How to". I love sharing ideas and projects and I hope that it's one that will get some interest for one of the classes I will be offering at the shop. ^_^

Until the next time...........Hugs,
Regi


Tomorrow I'll be showing "How to" make a shell cross!!!

Wednesday, November 5, 2014

Welcome the month of ThanksGiving!!!

Happy Wednesday peoples!! I can not believe that yet another month has come and gone and the beginning of November is here. It's the month we have ThanksGiving and yes before you think I totally forgot how to write......I wrote Thanksgiving as I see it. A time of Thanks and a time for Giving of oneself. Of course, I try and practice both all year long not just this month. I hope that YOU do too.

Sadly with October ending that meant all the Halloween decorations had to come down. I LOVE my decorations....especially my Halloween ones but at least November is one where I can decorate too. Yea!!

My simple WELCOME banner and yes....YOU are always welcome here.
Not many decorations in the B&B but this lil pumpkin and fall flowers to make a SMILE.


Like my "Give Thanks" banner? I tweaked it a bit from the original. I found the templates for the letters at this cute blog called "At Second Street" (click on the name if YOU would like to make one) I printed the letters on white cardstock and then using my X-acto knife cut out the inside of the letters. Had to be VERY careful cutting around those curly cues peoples....very very careful. Once cut out I used some vintage papers from an old poem book I have. I placed them on another piece of white cardstock and then placed the cutout on top of it. I used a school glue stick to stick them together. To run a ribbon through just cut slits in the top portion of the card. Presto....you have a banner!!


This is one of my ooaks from 2009. Her name is Gypsy and she LOVES blackberries. Her wings are real butterfly wings. Oh noooo I did NOT kill a butterfly so stop that gasping ^_^   Mother Nature blessed me with finding them after the lil creatures soul had risen. I love using them in my pieces when I am blessed with them. 


Another one of my ooaks, Apple Annie. Fall is the perfect time for apples, yes?


I collect bears...love my bears!! It's fun dressing them up for different holidays too. Here's pilgrim bear. Simple outfit made from felt (hat, vest) a linen napkin (shirt collar) black ribbon (tie). Did you notice the beary cute turkey in one of the earlier images? Like I said.....I love to decorate the bears.

This big little bear really gets to enjoy several holidays. Remember the pirate from last month, aye? His under clothes stay as well as his felt boots year round. I made them for the Chazman's first Halloween costume out of felt...they just slip over shoes and in this case.....bear feet!! His vest is made from a piece of suede and I would normally have beads hanging down from the strings on the sides but Piwacket was WAY to fascinated with them.....perhaps next year.  That's a real bear tooth hanging from his neck too. He's a chief....can ya guess his name? Nooo? It's Chief Standing Bear of course.

Have to add a bit to the phone table.

So that's my simple Thanksgiving decorations. Thank you for taking a peek. I love when you come to visit and I hope that you will leave me a comment to let me know you stopped by. Love my comments!!!

Until next time...........PEACE,
Regi

Thursday, May 1, 2014

Cute corner paper bookmark...YOU can make!!

As most know, I LOVE to read....so that makes trips to the library very common and VERY frequent. Yes, I still love to hold a book in my hand, smell the paper and mark my place when I have to reluctantly close it for awhile. I started sometime last year making corner paper bookmarks to take with me when I was checking out books and it seems that several of the patrons liked that idea. Now, every few months or so I take in a bunch to be given out. I thought perhaps some of you who love to read like I do, might just want a paper bookmark all your own. 

Here's what you will need to get started...not much....but every project has a few needed items, ri iight??

I love using these scrapbook papers for my bookmarks especially the 12x12 size because you can get 4 bookmarks out of one piece of paper. You can use anything really though. Gift wrap paper, old greeting cards or even print out your own images. I just like to use cardstock paper so that it will have some strength to it.
You will also need a ruler, pencil and scissors. The paper here is what I picked out to use as my "follow along" piece. So let's "Follow along"...shall we. hehe
 You want to measure your paper out to a 6x6 piece. 
 Flip it over on the plain side and turn like this. If it looks like a triangle then ya turned it right. 
 
 Take the bottom point and line it up to the top point and run your finger over it several times to get a good crease line...it should look like this. Then open it up, turn it once to the right and do it the same way again.
 Once you have folded the second time, open it up and place the top point and the bottom points centered in the middle where the crease line is. (See that's why I told ya to crease it earlier...cheat line)
 Fold it over and it should look like this.
 Flip it so that the longest part is downwards. Take one corner and fold over to the middle. You should see the crease line to use as the folding point.
 Do the other end the same way and you should have what looks like a bat flying really fast towards you. Well, that's what the Chazman says it looks like to him. ^_^  It should look like the picture above. 
 Flip it over and you will see that we make a little pocket. 
 Tuck one of the flaps inside the pocket. Then tuck the other flap inside. Once both are tucked in you can press the seams tighter with your fingers.
 YOU just made a cute little paper corner bookmark!!

These bookmarks really hold up well and can make cute little gifts. You can embellish them just about any way you want to. Just remember that they mark a page inside the book. 


Hope you'll try and make a few for yourself and friends. Let me know if you do, I would love to see them.

Until next time..........Hugs,
Regi