I know that a good while back (probably well over a year...I think) I did a "How to" on making a paper box. It was made from card stock which made it sturdy enough to cover in fabric...which I did!! ^_^ I needed some little boxes to put the Chazman's little WhoDoo characters in and that's why I remembered my paper boxes from earlier. I really didn't want to make the heavy duty ones as I know good and darn well that these aren't going to make it through the opening up part..hehe. I thought that some of you might want or need a small box to put a gift in and well I thought you might just like to make it yourself.
Step One......using a piece of letter size paper, take and fold one edge up into a 90 degree angle. Like this...
 Cut along the line with scissors or whatever sharp instrument (exacto knife, paper cutter) you feel comfortable with. Me...I do good with scissors. ^_^
Step Two......After cutting off the edge (you can throw this away or keep and use to make a little gift card with it later) Unfold paper...turn and fold opposite corner up to meet top corner. Once open you should have a nice X (or cross...depends on how you look at it) in the paper.

Step Three.....Take each corner and place point in the center of the paper. It should look like this when this step is complete.

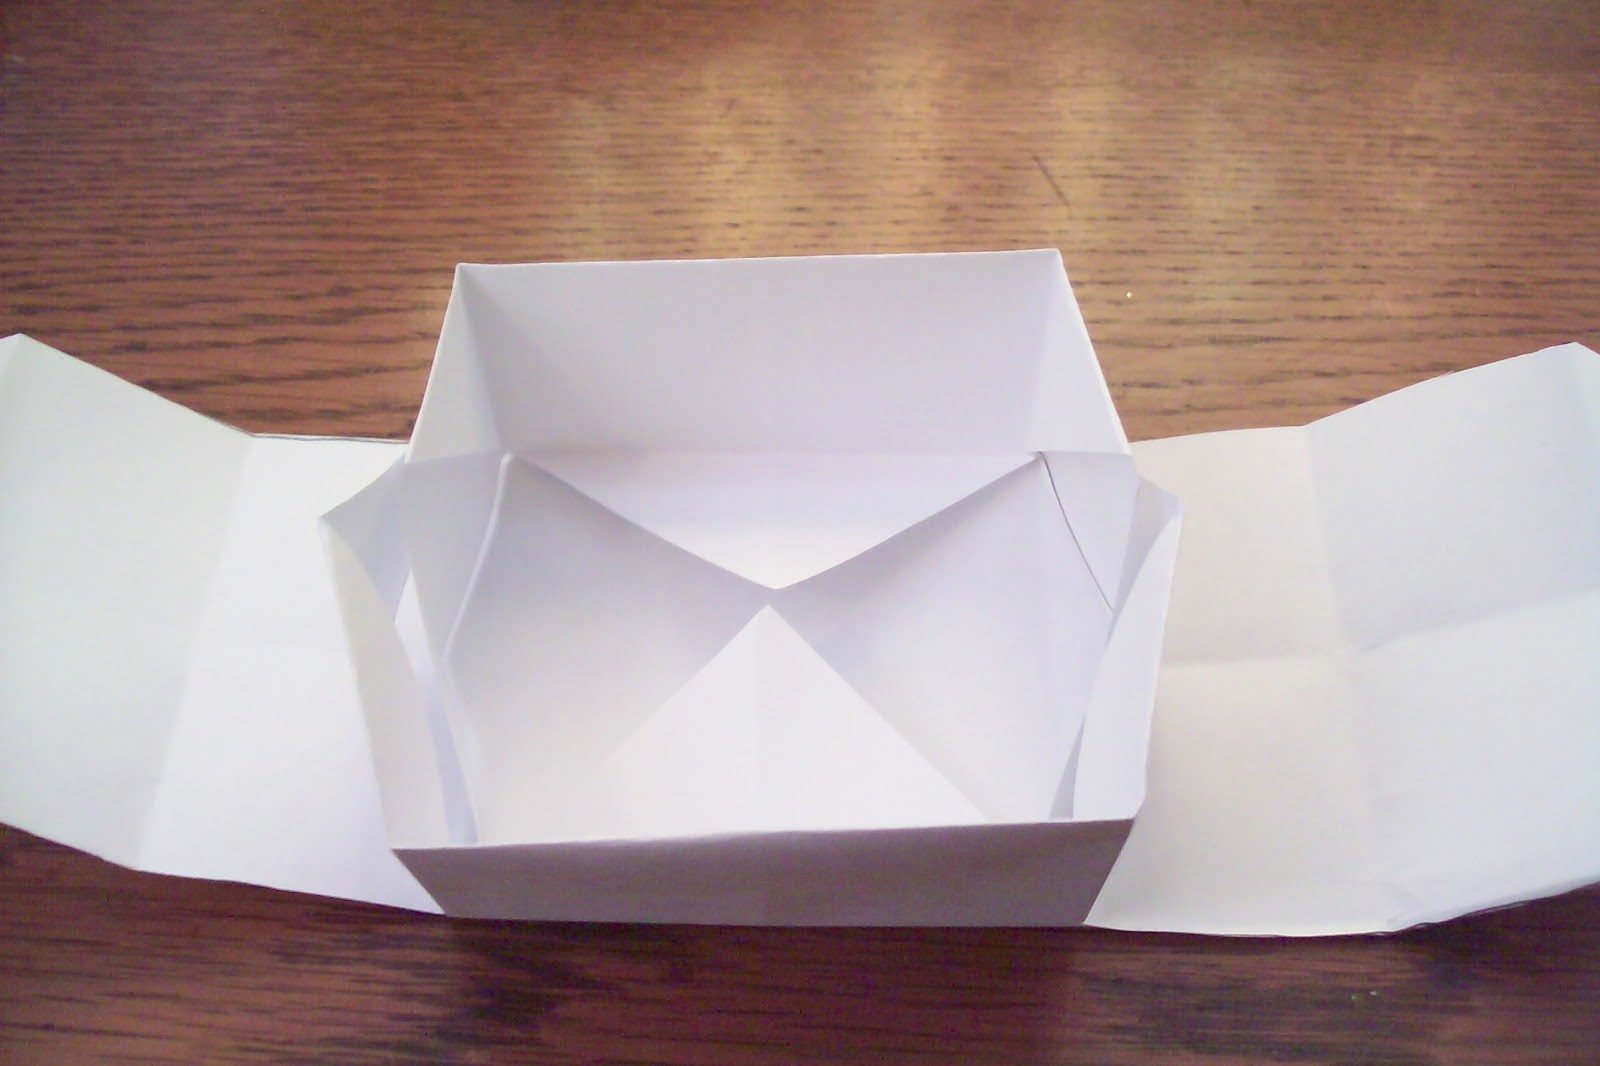
Step Four......Take the bottom of one side and fold it to the middle. (Should look like photo below) Take the edge directly across from that one and do the same. Open them up and turn paper and repeat for those two sides.

Step Five......Open up paper and cut one side up to the center square. (Where my lines are drawn) Repeat on the opposite side of paper once completed. Only do the two sides!!

Once cut the paper should look like this.....

Step Six......Turn paper around and fold the first flap over. Then take and fold upwards. Take sides and fold inside. It should look like the second photo below after this step.


Step Seven....Repeat on the other side. Then take the smaller flaps and fold them over the sides making sure that your points on sides are tucked inside one another. (makes folding easier)


Now...wasn't that easy peasy? You just made the top part of your box. To make the bottom part follow the same steps. Just make sure after you fold the first edge 90 degrees, to cut about 1/4 in further than you did the first time. This will make the top fit over the bottom.
Now if you don't want a plain white box, you can use scrapbook papers, Christmas wrapping paper (just make sure your design is on the outside when folding...HEY...I forgot the first time) brown paper bags, really just about anything that can be folded easily. You could even color on the white paper or splash some paints on it and let dry or even do some stamping on it. Your imagination has no boundaries...remember that!!!
I left the Chazman's boxes white because I knew that the pretty pom pom bow I was going to make would pretty much cover what ever was on the paper. WHAT? You say you want to know how to do a pom pom bow? No problem..hehe You will need string or yarn...scissors (yes..just scissors this time) and a plastic credit card or gift card.

Step One.....Take string and measure out at least 84 inches. YIKES..that's a lot of string or yarn you say but it really isn't. YOU might even want more if you want a fuller pom pom. Just sayin!!
Step Two....Cut a separate piece of string about 6 inches...this is your piece that will tie all the other string together once you finish wrapping it around the card. Just lay it one way on the card (either way is fine..the longer side just make a bigger pom pom) and then start wrapping your string the opposite.

Step Three....Once you have wrapped all of the string on the card, take your tie off piece and tie it off. HEHE. Then gently slide the string off of the card.

Step Four.....Hold both ends and flip it over. Tie this side and make sure you make two knots or ties here.
Take scissors and place in between loops on one end and cut. Repeat on the other end.

That's how you make a pom pom bow. You can fluff now if you want but I find it much easier to wait and fluff after you have tied it onto your package. I use a different string to tie around the package and then I tie the bow on.

Now you know how to make a little paper box with a cute pom pom bow. I hope my directions were simple and I hope that you can use this "How to" to help you out with some of your gift giving wrappings.

Until next time...........Hugs,
Regi
Step One......using a piece of letter size paper, take and fold one edge up into a 90 degree angle. Like this...

Step Two......After cutting off the edge (you can throw this away or keep and use to make a little gift card with it later) Unfold paper...turn and fold opposite corner up to meet top corner. Once open you should have a nice X (or cross...depends on how you look at it) in the paper.

Step Three.....Take each corner and place point in the center of the paper. It should look like this when this step is complete.

Step Four......Take the bottom of one side and fold it to the middle. (Should look like photo below) Take the edge directly across from that one and do the same. Open them up and turn paper and repeat for those two sides.

Step Five......Open up paper and cut one side up to the center square. (Where my lines are drawn) Repeat on the opposite side of paper once completed. Only do the two sides!!

Once cut the paper should look like this.....

Step Six......Turn paper around and fold the first flap over. Then take and fold upwards. Take sides and fold inside. It should look like the second photo below after this step.


Step Seven....Repeat on the other side. Then take the smaller flaps and fold them over the sides making sure that your points on sides are tucked inside one another. (makes folding easier)

Now...wasn't that easy peasy? You just made the top part of your box. To make the bottom part follow the same steps. Just make sure after you fold the first edge 90 degrees, to cut about 1/4 in further than you did the first time. This will make the top fit over the bottom.
Now if you don't want a plain white box, you can use scrapbook papers, Christmas wrapping paper (just make sure your design is on the outside when folding...HEY...I forgot the first time) brown paper bags, really just about anything that can be folded easily. You could even color on the white paper or splash some paints on it and let dry or even do some stamping on it. Your imagination has no boundaries...remember that!!!
I left the Chazman's boxes white because I knew that the pretty pom pom bow I was going to make would pretty much cover what ever was on the paper. WHAT? You say you want to know how to do a pom pom bow? No problem..hehe You will need string or yarn...scissors (yes..just scissors this time) and a plastic credit card or gift card.

Step One.....Take string and measure out at least 84 inches. YIKES..that's a lot of string or yarn you say but it really isn't. YOU might even want more if you want a fuller pom pom. Just sayin!!
Step Two....Cut a separate piece of string about 6 inches...this is your piece that will tie all the other string together once you finish wrapping it around the card. Just lay it one way on the card (either way is fine..the longer side just make a bigger pom pom) and then start wrapping your string the opposite.

Step Three....Once you have wrapped all of the string on the card, take your tie off piece and tie it off. HEHE. Then gently slide the string off of the card.

Step Four.....Hold both ends and flip it over. Tie this side and make sure you make two knots or ties here.
Take scissors and place in between loops on one end and cut. Repeat on the other end.

That's how you make a pom pom bow. You can fluff now if you want but I find it much easier to wait and fluff after you have tied it onto your package. I use a different string to tie around the package and then I tie the bow on.

Now you know how to make a little paper box with a cute pom pom bow. I hope my directions were simple and I hope that you can use this "How to" to help you out with some of your gift giving wrappings.

Until next time...........Hugs,
Regi
Love this and thanks for showing us how to make our own :)
ReplyDelete