Wednesday, December 21, 2011

Chaz the Wizard!!!

OMGOSH...I can't believe we pulled one over on our Chazman. Poor dear is as gullible as his momma. HaHa   I would have loved to have gotten this on video and of course at the time...arrrggg...my batteries were going low. (Something keeps draining the dang things.....I guess it's our little ghostly housemate) See if you can guess what we were able to pull over on him by these photos.


Oh the games we play....on our kiddos..hehe!!! Did you guess what was happening? Want me to tell you? No!!  Well, alrightie then....keep thinking. While you are thinking about what could be happening, here is what our cat thought about it.
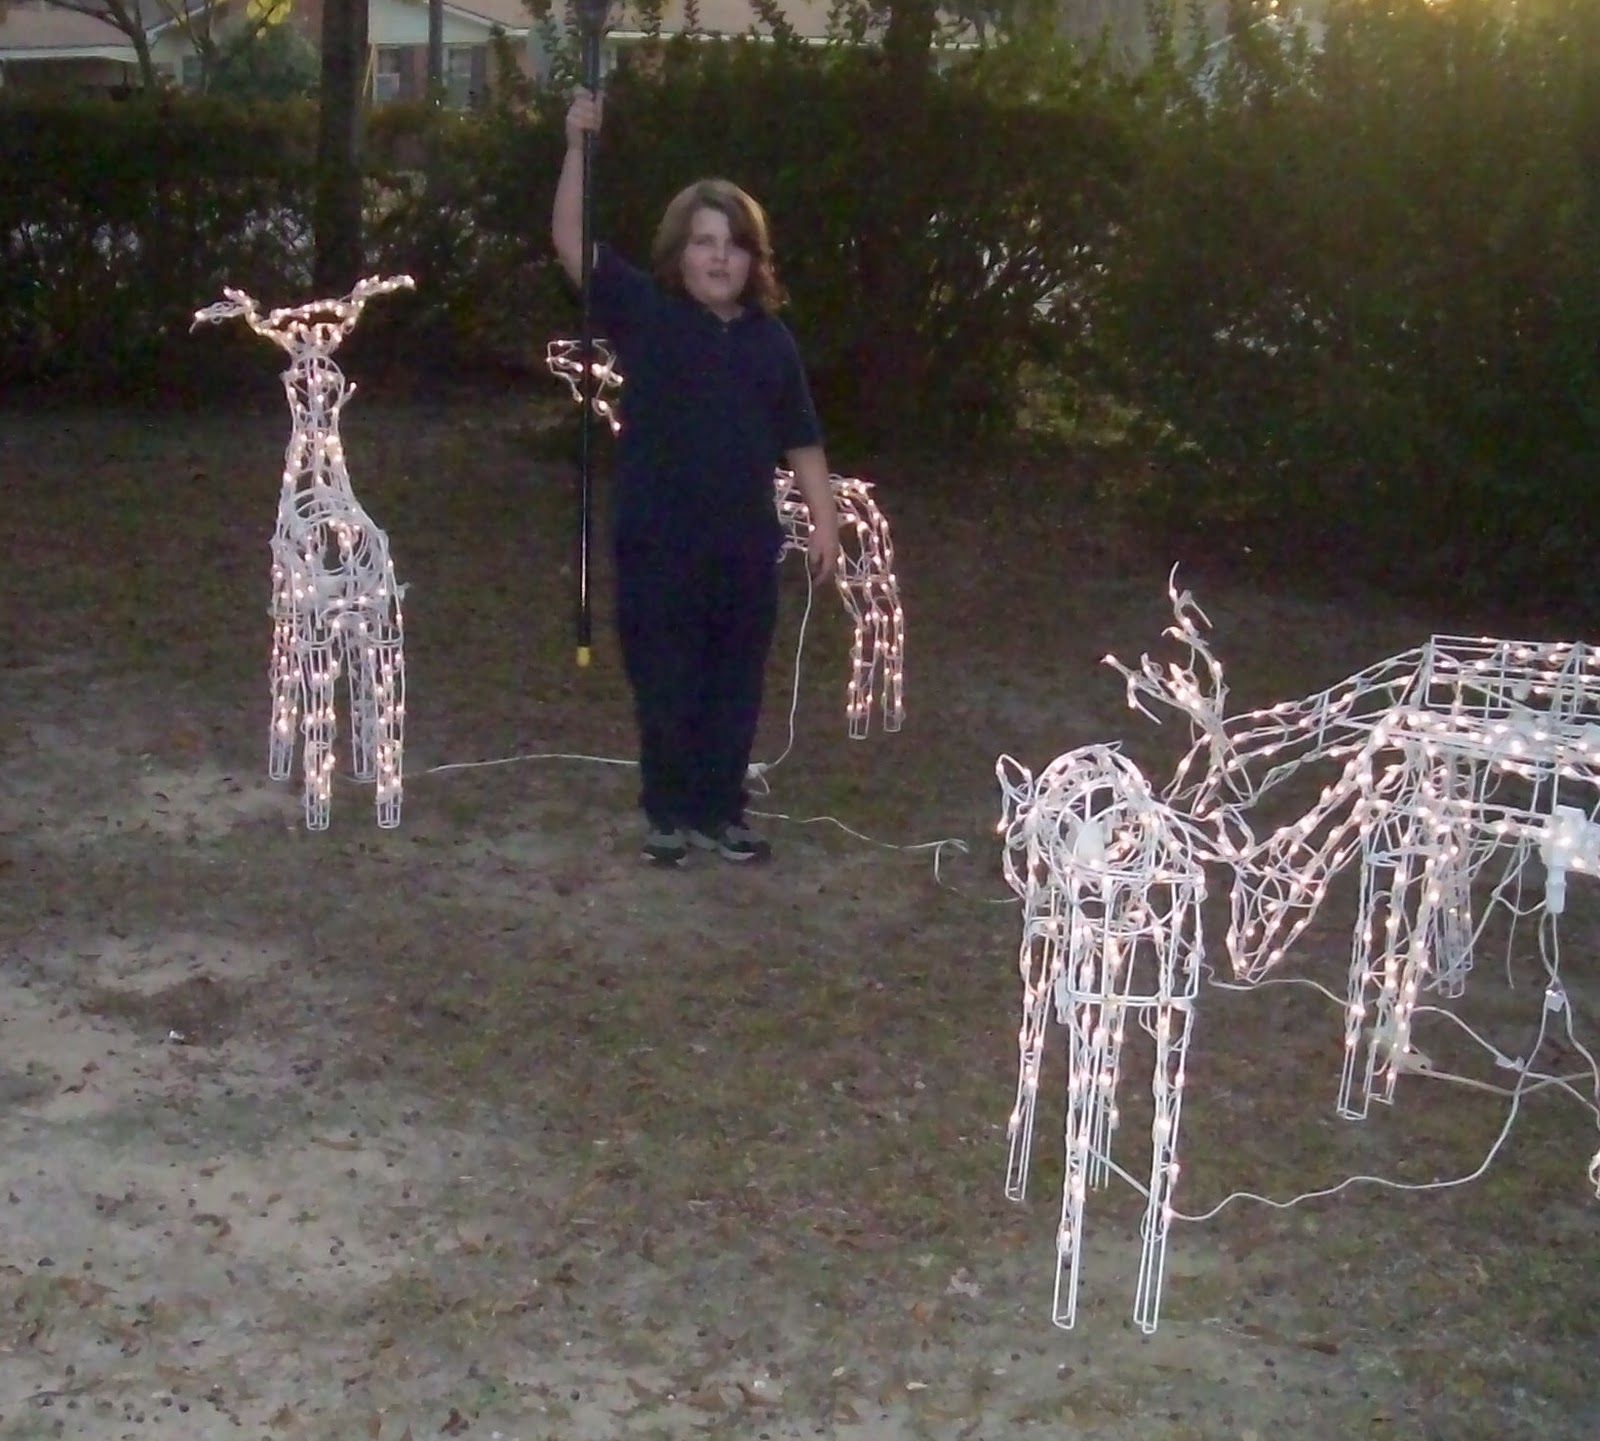
Ms. Peaches would look at Chaz and the reindeer and then turn and look at us when my giggles turned into full out laughter. She was getting rather confuzzled I do believe. She finally walked over to me.
Meoooome...(that's what she calls me....really..it is) "Please tell me what's happening...I'm getting purrrrfectly confused over our human child's reactions out there". Have you guessed yet? Ready for me to tell you? It's really funny and we all laughed so hard over it....that is after the Chazman got over being very upset with us.  You see, his daddikins was standing in the door way and every time Chaz would take the broom and hit the ground he would either turn the light switch on or off...that made the lights on the reindeer either be ON or OFF.....ROFL!!! The reason the Chazman got so upset is because he thought that he was doing magic. It almost made me not want to tell him it wasn't him but I decided it might be best to go ahead and fess up. I mean he might try flying next and that could really turn out bad. Once he got over the angry/mad/upset/I can't believe you would do that to me stage..he giggled and then laughed.

A memory can be built on the smallest thing. When you get the chance to help that memory be one that will be long remembered....make it!!!

Until next time...........HUGS, Regi

Tuesday, December 20, 2011

Three little Mermaids!!

I don't believe it....I mean...I REALLY.....don't believe it!! Really....can YOU believe it? Can you? Huh Huh??Ohhhh, I guess I had better tell you what I can't believe. I'm sure you aren't going to believe it either though. I finished my niece's Christmas gifts today. I know....it's hard to believe, ri iight?? Those that know me....know that normally I am burning the WAY past midnight oil whenever I am working on gifts. What am I going to do with myself now? I already feel lost from not having to be busy at trying to get something done. WOW...is this what it actually feels like? To not be rushed? I LIKE IT!!!

Like....a word that we all want to hear when we make something for someone special to us. Well....LOVE would be better but with two of my nieces being teenagers...I will take...I like it!!! My youngest niece turned 7 this year and is such a little woman...really..she is. I sometimes forget when I'm talking to her that she is only a youngin but then she goes and does something completely silly and just like a normal 7 year old would do and I remember...LOL!! Since she is a young lady now...along with her sisters, I decided to make them each a jewelry box. Something to hold their precious treasures in. To guard their treasures there is none better than a true keeper of treasures...even if they are land ones and not from the sea. Each box is hand painted with one of my mermaids.
This one is for my oldest niece. She is a HUGE LSU fan and I do mean HUGE. One of those that probably bleeds purple and yellow. I wouldn't know because I run for the hills whenever I see blood. Ewww!! But I bet a dollar that she does. Since she is such a HUGE fan I painted her mermaid with a (yep, ya guessed) a purple and yellow scaled tail. She also has brown eyes and dark hair just like my niece. I also made the gift tag to go along with it.


This one is for my next to oldest niece. I know that I could have said middle niece but we don't say that. Have you ever heard about the middle child syndrome? She hasn't because we say next to oldest and that's the way we want to keep it..LOL!!  She is a HUGE, ummmmm......that other university from Alabama...you know the one. I don't know what happened to her mom...she is one of THOSE too. We were raised that ________ was a bad word so I just don't know what happened. OMGOSH...alright...I will say it......auburn.  There...are you happy now?? hehe.  Since she does love Auburn so much I painted her mermaid with a orange and blue scaled tail. Her eyes are blue and her hair is red with golden highlights....yep...just like my adorable next to oldest niece. Here is her gift tag too.


Finally...last but by no means least, is the mermaid for my Li'l lady of a niece. She just loves everyone and everything so her mermaid I painted a purple tail with light green scales. She has light brown eyes and golden brown locks...yes...just like my little sweetie pie. Li'l miss was actually a mermaid last year....ohh yes she was. In the ballet "Peter Pan". She was, of course, adorable and nothing like her very shy aunt. She loves a crowd.
Her keepsake box has a gift tag too.
Now.....I hope to hear "I LOVE IT" but I will be just as happy with "I LIKE IT".  We are looking forward to spending some time with them on Saturday night. The kiddos will get their gifts...then we will be eating some delicious red beans and rice (my BIL is a true Cajun and owww weeeeee one heck of a cook) then eat some yummy sweet goodies and probably watch a movie together or play a game. Family...is what makes this time of year special.

Now....what can I start working on now.....................................

Until next time......HUGS, Regi

Monday, December 19, 2011

Treasures Found!!!!

I'm so excited that we found some of our treasures that I just knew had gotten lost. We found them by chance too. Joseph went on a search for a pair of coveralls in the storage shed and while he was plowing looking through everything he found them for me. Ohhhhh HAPPY DAY!!!!

Now I know that you are saying "HEY Reggikins....we saw your beautiful Christmas tree already". THank you for the compliment..HA!! It's not the big tree that's new in the photo. It's the small tree sitting on the stand next to it.
Isn't it a beauty in itself? This is a vintage Christmas music box. It dates back to the early 1900's and it completely and totally belongs to the Chazman. Yes..yes..when he is grown and moves out (which he tells me he is never doing) I will let him take it with him. I will...honestly...I will. ^_^  It originally belonged to one of my BILs. When Chaz was a toddler he would sit and just look at it. Never touching it...just gazing at it. He would point to the tiny snow baby and say "Babieeeeee". My BIL lost it at that exact moment. I don't mean lost it as in crying....I mean....he actually lost it. He gave it to the Chazman. Chaz was so excited when we found it and could set it out this year.

Now this is the one that I was happy we found. It's the Santa bear I made for my Dad and Mom about six years ago. Nothing fancy but he holds some precious memories for us.

It truly was a weekend for finding treasures. I was going through my art journal and found my directions on making acorn top ornaments. This is going to be a project for the Chazman and I this week since he is out on break.

Until next time........Hugs, Regi

Friday, December 16, 2011

"Party like a ROCK ....party like a ROCKSTAR"

WOW....I can...like totally.....so understand that phrase now.   I know you are probably in shock...go ahead...run around the desk holding your face and screaming "It can't be so...tell me it isn't so".  Of course, it isn't so.....SO you can sit back down and relax. What I mean by the phrase is that I pulled an all nighter and I haven't done that in many many many (whew) many many many many...ok..I think ya get the point....years!! It seems that cutting all the different pattern pieces and then sewing 25 penguins takes a tad bit more time than I thought.

I will have to take another pic of one of the penguins when the Chazman gets in from school. Either my camera or perhaps even myself was a tad bit out of focus and the pic didn't take. I didn't make them exactly like the original one I showed ya'll in my earlier post. I didn't make them a hat but I did make their scarves out of real wool. I didn't get a chance to add my faux snow flakes or glitter either. I LOVE to play embellish with my faux snow flakes and glitter. I really do....even if I end up somehow wearing more of it than I should..hehe. DON'T ask!!!!

I did manage to get a few shots of the "BOX". You remember the "BOX"...ri iight?? The one I painted for the mummies to be delivered in. You do remember the "Mummies"...ri iight?? (why am I suddenly feeling like I'm in a very old detective story?)  I took the same box...HA....I bet you thought I was going to type "BOX" again...didn't you?  OK I need coffee to.....snap out of it....as the Chazman would say. Like I was saying..I took the package, removed the mummy info and touched it up a bit.

Why is it that the pretty twinkles of our glitter don't show up in pics.....arrggggg!!  I guess I will have to just tell you what I'm talking about. Three of the corners I painted with white paint...to resemble snow of course. The package is coming from the North Pole. Once the paint was dry, I added a coating of Twinkles crystal glitter. HEY...I did get to play with some glitter but sadly not the kind that you can wear...ummmm...I mean the kind that accidently spills on you like faery dust. Wait...I said "Don't Ask"  ^_^  so I'm not telling..so pfft ....there. My, my...please forgive...the rockstar in me apparently can't ROCK it all night long anymore...I am apparently delirious from lack of sleep.

I found these really cute tags online. I love the North Pole mailing label with the "ELF INSPECTED and SANTA APPROVED" stamped on it. The four little stamps really added to the.........package (gotcha) but I almost panicked when I went to print them off and discovered that my colored ink cartridge was empty. No worries though....I came up with an idea to use them anyways. Yep...I can come up with ideas when I haven't pulled an all nighter. I did the printing BEFORE the party!! I printed them off using my black only cartridge and then water colored them with my water color pencils. Love my water color pencils!! It gave them a vintage look...don't ya think? The big Santa tag is one that is appearing everywhere it seems. I really love it and knew it would add to the ........parcel.......so I printed it off in black only and painted it.There again..my twinklie, sparklie coating is not showing up. I covered Santa's beard, hair and eyebrows with it and it really looks awesome...not the dull color showing in pic. Could be the photographer though!!!

 Chaz said he is bringing the box and the tag home this afternoon. The tag he is going to hang on the tree. I just love when my kiddo loves something that I have made. Ahhhhhhhhh....let me sit and relish in that feeling a moment. Nooo, better not...I might nod off ^_^

Until next time............Hugzzzzzzzzzzz

Thursday, December 15, 2011

Hot Dr. Pepper...anyone?


I love vintage!!! Vintage photos....vintage images....vintage advertising.....vintage ANYTHING!! I have a nice little assortment of vintage and wanted to share this one with you today. Don't laugh...I see that smile. Have you ever tried Hot Dr. Pepper? Imagine one of those chilly, windy, blustery, cold winter days when you want something to warm up those bones...something different. I think this would be that something different. It's actually pretty good and just something unique to have in place of that hot cup of coco or tea. Easy peasy to fix. Just pour it into a sauce pan and heat til simmering. Place a thin lemon slice in the bottom of a mug....pour the simmering Dr. Pepper over it and then enjoy. It really will warm you up!! Of course, you need something to eat to go with it....so here is one of my favorite recipes for this time of year. So many different variations you can do with this simple basic recipe. What is it you ask? It's shortbread. "S' isn't just for Santa!!!

Basic Recipe (Tasty plain too, especially with a cup of hot peppermint tea or simmering Hot Dr. Pepper ^_^)

1 1/4 cups all-purpose flour
3 tablespoons sugar
1/2 cup butter (no substitutes)

**Combine flour and sugar in medium mixing bowl. Cut in butter until mixture resembles fine crumbs and starts to cling together. At this point, the dough may look dry, but the next step will take care of that. Form the mixture into a ball and knead until smooth. The heat from your hand softens the butter slightly, that is what makes the butter become so smooth.

**To make wedges, pat or roll dough into an 8-inch circle on ungreased cookie sheet. Press with your fingers to scallop the edge. (FYI: According to Scottish tradition, the scallops represent the rays of the sun) Cut the circle into 16 wedges, this will keep the bread from crumbling or breaking when you cut it after baking. Prick each wedge in it's center with a fork.

**Bake in a 325 oven for 25-30 minutes or until bottom just starts to turn brown and center is set. Cut circle into wedges in the same place as before while still warm. Cool on cookie sheet for 5 minutes. Transfer to wire rack and cool completely.

**If you like you can make these into rounds instead of wedges. Roll dough on a lightly floured surface until 1/2" thick. Use a 1/2" thick cookie cutter to cut out 24 rounds. Place them 1" apart on ungreased cookie sheet and bake for 20-25 minutes.

Variations to try:

Cornmeal Shortbread (great with soups and chili)
Prepare basic recipe as directed, except substitute 1/4 cup cornmeal for 1/4 cup all-purpose flour and add 1/4 cup cheddar cheese...or 1/4 cup dried cranberries.

Lemon-Poppy Seed Shortbread
Prepare basic recipe as directed, except stir in 1 tablespoon poppy seed into flour mixture and add 1 teaspoon finely shredded lemon peel with butter.

Oatmeal Shortbread (great for breakfast with a bit of jam, jelly or marmalade on top)
Prepare basic recipe as directed, except reduce all-purpose flour to 1 cup. After cutting in butter, stir in 1/3 cup quick-cooking rolled oats.

Spiced Shortbread
Prepare basic recipe as directed, except substitute brown sugar for sugar; stir 1/2 teaspoon ground cinnamon, 1/4 teaspoon ground ginger, and 1/8 teaspoon ground gloves into the flour.


Like I said...so many different variations. I hope that you try this recipe....it is such an easy and changeable recipe for so many treats. It would be a great item to place in a gift basket too...along with a pretty tea cup!!

Until next time...........Happy cooking HUGS, Regi

Wednesday, December 14, 2011

Make a Reindeer!!


The reindeer itself is one of the Chazman's doodles....not one that I did for him but one he did for me. I just took that and made my pattern. If you don't have an upcoming artist in your household...no problems...just draw you a pattern for my "HOW TO" that I'm getting ready to do for you.

Supplies Needed:
Felt or Fur (in two different shades)
Black Seed Beads
Black Pompoms or red if you want to make Rudolph
Pin backings
Jingle Bell
Brown Embroidery floss
Black thread
Stuffing/Batting
Hot glue
Glitter or MICA flakes

Now keep in mind that these are simple, FUN pins to make..so you can design your head and antlers in any shape you want. Decide what size you want and then fold over the felt or fur....leaving the fold as the top of the head. (do not cut the fold) This what you should have once you cut out the head.
Next step is to sew on the eyes, nose and pin backing. I use regular black thread to sew these on with. I don't cut my thread after sewing the face but I do make sure I knot each one before I move on to attaching the next eye and then the nose. I add one line under the nose over to the side for a mouth. You can add one...or not. Remember..this is your reindeer. After face is complete then turn the head around so the back is facing you and sew the pin backing on. Here is what you should have after this step:
Next are the ears and antlers. Again...keep in mind what these look like on a real reindeer. Here is the design that Chaz did. The antlers should be a darker color than the reindeer and ears.
I sew the ears first. Just a few stitches...simply fold them in half and sew at the bottom...so they have what looks like a tiny ear hole in them. Open them up and then sew them to the bottom part of the antler. Then sew the two bottom corners of the antlers over the bottom of the ear. Here is what they should look like.
Now...let's attach those ears to the face. Take the face and fold over so the face is in front and the back is well....in the back ^_^.  Take the ear and place right at the fold in between the face and back. I use a simple whip stitch with 3-ply embroidery thread. Once you have the front whip stitched then turn it around to the back and stitch the same way. When starting on the front I start at the bottom of the ear so that I am working my way up and around to the back and then I'm lined up to whip around the face. Now...whip around the face. When you get to the other side about half way...STOP...it's time to stuff that face ^_^. It doesn't take much....you just want to fill the face out a bit so it doesn't just lay flat. Our reindeer needs a bit of personality!! Here is what it should like at this stage.
Once you have the face filled out, place the other antler in it's space and stitch the same way you did the other antler. Just remember to stitch it to the front and the back. Don't want any little hands pulling Chet's (that's what Chaz calls his reindeer...LOL..yes we watched the Santa Claus movies this weekend) ear to hard and pulling it off. Now add a jingle bell or two to the bottom and your finished. Here is what the finished piece should look like.
Of course....all of you that know ME...know that I can't have a plain reindeer. I took all of my little herd and using my glue gun and some MICA flakes...I made it look like they had played in the snow. The possibilities are endless here people...honest...just use those imaginations. OK...you need some ideas..well..here are a few. You could sew some of those miniature strings of lights to his antlers and top of his head like he got all tangled up in em. Or perhaps some of those tiny plastic snowflakes that come in a string like garland...sew those to the antlers. Or maybe if you want to make him look "cool" you could make him a tiny leather collar....and owwwww maybe a little leather hat to go ummmm....HEY...I know YOU and I know that you have just as vivid an imagination as I do...well..ok..maybe not everyone but I know you can do it...so do it!! Then let me see what your reindeer looks like...I love to see when someone else has used a shared idea.

I hope that you have enjoyed this repost...yep..it's one I did last year but thought I would share it again for my new friends I've made since then. OMGOSH....and I'm so not calling those that were here for last year's post old...nope...not doing that. Besides..I'm sure I'm older than most anyways...so that would be the pot calling the kettle black huh?  LOL

Until next time...............HUGS, Regi

Tuesday, December 13, 2011

I SEE PENGUINS!!!!


25 Penguins to sew all the day
25 Penguins to sew
Finish one up
Toss it aside
24 Penguins to sew all the day


That's going to be my song for the day..ALL..THE..DAY..LONG!!! LOL  I so don't mind though because these Li'l guys are going to the Chazman's Christmas party at school on Friday. They are so simple to make and only take a few supplies. 

Supply List (if you want to make some yourself)

Felt (Black-orange-white-off white-Burgandy)
Black and White Thread
Black seed beads (for eyes)
Faux snow or glitter
Pin backing/Bobby pin/Hair clip/Embroidery thread

Pattern (feel free to borrow mine)
Body Cut 2
Face Cut 1
Beak Cut 2
Flipper Cut 2
Feet Cut 4
Medium YoYo
(for hat)
Small YoYo
(for snowball)
Scarf Cut 1

I think you can look at my already made penguin and see how to make it. I would do a tut but I just don't have the time....YIKES...these have to be done by Friday morning...on top of the other projects I have going on. Someone, remind me to start making all these wonderful gifts right after New Year's day..ppplease!!!

I can give you some tips though. I hand sew all of the penguin....they are small and it would just take to much time on the machine. Well...for me anyways ^_^  I use a blanket stitch on all the sewing. I'm sure most know what type of stitch this is but just in case.......

Of course on the YoYo hat and snowball you will just do a straight stitch and then gather it up and tie the ends together to form each one. I put a tiny bit of batting in both. Put a tiny bit of batting in the body too.

The face I just sew on when I sew the sead beads on for the eyes. On the beak you will cut two and sew just the tops together. I put two small straight stitches where the nostril holes would be. Why cut two of the beak you ask? It makes it look like the penguin has a real beak...hehe!! I also sew these on before I sew the body and stuff it. Just makes it easier.

I cut two of the feet (that would be four actually....two pieces for each foot so that penguin has 2 feet. Got it?) I don't stuff these but having the two pieces blanket stitched together just looks better. Gives it more strength so they will last. I sew these on after the body is stuffed and sewed.

Once you have penguin put together then you simply sew a flipper on each side....put a snowball in one flipper...his hat on his head and his scarf around his neck. I made the scarf for the above penguin out of a strip of felt but with the ones I'm currently working on I'm going to use an old sweater. Use your imagination..there are so many possibilities. I add faux snow flakes to the flippers and the snowball. Glitter works good too. Embellish yours how ever you want. I KNOW they will turn out awesome!!

You can turn these Li'l guys into pins to wear.....attach a bobby pin or hair clip....slide it on a headband or ribbon or just attach a hanger from the hat. Again...use your imagination and have FUN!!! Now let's start singing......................

Until next time.....Hugs, Regi


Monday, December 12, 2011

Oopsie and Tig!!!

I have soooo much to get finished by Friday. Where in the world has the time gone to? Someone? Anyone? Please grab it and hold it for me ppplease!! So without rambling any more..hehe..here is the introduction to Oopsie and Tig. (Two of the cloth critters I have been working on) They are so happy to meet you!!!!

Oopsie and Tig
Oopsie is so excited to find out who will be his new caretaker!!
Tig is excited too but seeing that he is a CAT...he isn't letting on!!
Just look at that cute monkey face!!
Awwwww...who could resist those eyes?

Until next time............Hugs, Regi

Sunday, December 11, 2011

OMGOSH..I forgot how much fun Barbies were!!!

Yes...I admit it...openly!!! I played with a Barbie this weekend. What memories came pouring back to me. The Saturday night sleep overs with one of my best friends...completely taking over the living room for the weekend with all of Barbie's things. Believe me that was an honor too because Momma NEVER let anyone go into the living room unless they were special company. Getting off on a small tangent here about Momma and the "Living Room".  I remember when I was about 7 and had been really sick and Dr. Hall (our preacher) came to visit. I walked in the room...took his hand and took him to the breakfast nook and had him sit down at the table. Momma looked at me and asked what I was doing. I patted Dr. Hall on the knee and told him I was sorry but the living room was only for special company. Can you hear the "GASP" from Momma? From that day on Lee and I could play Barbie in there anytime. (as long as she wasn't expecting any special visitors mind you) Now back to the present!!  Man oh man....did we ever have Barbie things. I'm probably going to tell my age here (well heck and dang it all...I'm sure most of you know I'm one of the ancient ones already) Do ya'll remember the big heavy cardboard fold out Barbie house from the 60's? I HAD ONE and was so proud of it. My Daddy even made me some furniture to go with it. Ohhhhhh...to be young again...just for a little while so I could play with my Barbie. Oh wait...I did play with one this weekend. I almost forgot..hehe!!!

I know ya'll must be sitting there wondering just how far off the deep in I have stepped. Knowing that I have a boy and no girls....(Noooo...Chaz will not play Barbie...well..he will with his young girl cousins if they ask nicely and they have a Ken or GI Joe man. Shhhhhh..don't tell him I told you that. He is just such a sweet Li'l guy) I must have had a nervous breakdown......ri iight?? Nope..I'm just as sane as always. Well..as sane as I can be. The Chazman was invited to one of his classmates birthday party...which is this afternoon. When I called to RSVP I asked her mom what L liked. She said that I probably only needed to know one thing that would help. L is a big time "girly girl". Now to a mom with a son..what in the world does that mean? She told me the L really loves Barbie. That was all she needed to tell me. The gift just "POPPED" into my head. I had to find me a Barbie.

Saturday morning I woke up with a mission. To find that Barbie. I know I could have gone to Wal-mart to buy one but that wasn't an option. I wanted to make an outfit for one of the Barbie dolls that L already has. I can't believe it but the first yard sale we came to...the woman had a box full of naked Barbies. Thankfully, she sold me one and back home we came. I had a blast designing a faery costume. Nothing fancy but it really turned out so pretty. I even made her some attachable wings.

Notice the top of her head? She had the craziest hair....well....if you don't count my crazy hair. She had the craziest hair for a doll. I made a little scrunchy to match the outfit thinking that maybe L's dolls hair might have some bad hair days itself. I couldn't stop at just the scrunchy though. I mean what self concerning faery with her finery on doesn't wear her crown too. Yep...I made her a crown.

Isn't she purty??

Once I finished the outfit I decided that it wasn't enough to give L for h er birthday. I mean I wasn't giving her my Barbie....she was old and used. Besides,  I might want to make more clothes and will need a model for them.....ri iight...that's the reason...not that I might want to relive my childhood and sit down for an afternoon and play with her again. Nahhhhhh)  Since I have been on a roll making the fabric flower hair clips, I thought since L is a girlie girl that she might like one or two. 


Now that I had the gifts made I realized that I needed something to put them in. Can you guess what I did? It seems once I get on a roll...I keep on rolling...LOL!!! I painted a box to hold all the goodies L will be receiving from the Chazman. Even made a sweet little tag to go with it. 


I hope that L has a wonderful birthday today and enjoys all the gifts she will be getting. I do hope that (fingers crossed) the Chazman's is one that will always be special to her. 

Until next time.....Hugs, Regi

Saturday, December 10, 2011

I made my own gift box..hehe

I hope that you read about how to make your own box in my last post. I also hope that they were easy to follow directions so that you could make some of your own. I enjoyed making the "How to" post so much for everyone that I made some more boxes...ten to be exact....LOL!!!  These were made for a purpose. Do you remember the flower garden I have been cultivating here of late? You know the one....don't you? The one that took up a weekend plus. Need a reminder? Just Click Here.   I made the boxes to hold these precious flowers plus I made three more flowers to add to the bunch.

I do hope that the little girls that receive them Christmas morning will love them just as much as I loved growing making them. I just love the fact that so many people are coming together to make Christmas a special time for the families that need the extra help. I'm very excited to be one that is able to use my whimsical talents to help out. Paying it forward is a motto that all of us should take to heart. I know that I certainly do. Let's take a walk and see the newest flowers clipped from the garden.


I love using fabric and ribbon. This little beauty of a rose was made from a wired satin ribbon and has cotton fabric leaves. Not only do I love using fabric and ribbon but I really love buttons. The prettier the better!!! On this one I was able to use two buttons. The white one looked like the center of a flower. How perfect...ri iight??  I just couldn't resist using this little butterfly button to go along with it. It's attached to a large clip barrette.


Here is another rose from the same bush. No thorns either...that makes it nice. We don't want any ouchies from our sweet little ladies.....now do we? I used one of my flower buttons for the center of this one and instead of a hair clip...I attached it to an elastic headband. Can't you just see a sweet baby girl wearing this?
Sit and imagine....now let's all say...........Awwwwww!!!


This little beauty is from the whimsical side of the garden. I had these fantastic, colorful fabric scraps that a friend gave to me in a big bag of.......scraps!! HAHA  They were just the perfect size to make these with. So important tip here.....never throw out those scraps you might think are to small to be keeping. I just adore all the colors in this one too. What do you think of when you see the colors? I think of ice cream..... Neapolitan ice cream and a scoop or two of sherbet thrown in with perhaps some peppermint. YUM!! I suddenly am in the mood for ice cream. ^_^   Hmmmmm...wonder why? Instead of raiding my button stash for these...I raided my vintage bead stash. Tiny, pretty pink pearls. The leaves surrounding the flowers are made from a ribbon. This one has a hair clip attached to it.

Now I have ten beautiful flowers in all to give away but I just couldn't hand them over to Ms Sue and say "Here ya go". I wanted them to be extra special so that's why I made the boxes. The box liked we talked about at the beginning of this post....the box that this post is suppose to be about. Sorry...I just had to wonder in the garden BUT at least I took you with me and you got to smell see the pretty flowers. For the boxes, I used white card stock......because I know that the box probably won't survive the opening process. I mean if they were big boxes...then they would be "priceless" but these are small boxes. I hope they do survive though because they are really cute and could actually be another gift in itself. For the top of the box, I found this cute vintage page from a children's book with rabbits....I love rabbits....don't you? Rabbits looking out the window at Santa and his reindeer flying over the snowy sky. I printed it off in black and white and then water colored it in to give it that vintage look for real. I applied a tiny bit of sparkle flakes to the rabbit tail....some red glitter by some of the holly leaves and even a teeny tiny piece of red glitter on the nose of the first reindeer pulling Santa's sleigh. RUDOLPH!!! Well....either Rudolph or the reindeer had one heck of a party the night before....but....that's....another......whole post entirely!!


Until next time.............HUGS, Regi

Wednesday, December 7, 2011

Making your own gift box!!


I know that there are several of us that like to make our gifts to give to our family and friends at Christmas time. (or for any of the special holiday traditions that are observed this time of year) I know that I do. For those items that are not very large....like say.....jewelry pieces.....small photo frames and small figures, why not make your own gift box. Scrap papers work great.....perhaps you have a special printed paper you have been wanting to use. Scrap fabric can be used to cover your box once made to make a gift all by itself. I mean what gal couldn't use a special made box to place some of her earrings or rings in? Or perhaps a cute Li'l pin cushion box with sewing supplies inside. There are so many ways to use a BOX!!!

Now that I have talked about making a gift box...let me show you how. It can be made to any size that you want. All you have to keep in mind is that you need to start out with a square shape. Now..go look through all those beautiful scrap papers you have, grab a pair of scissors and a pen and let's get started:
Supplies Needed:
Paper (scraps or perhaps a pretty print one)
Scissors
Pen

Take your square and pull one corner up into the other so that you have made a triangle. Gently crease fold.
Now open it up and turn it facing you where it looks like a diamond (or a kite...that's what the Chazman thought it looked like) Fold the bottom corner up to the top one, like you did for the first fold and then gently crease it.
This is how it should look so far. Got it? Good...let's move on. ^_^
Take a corner and fold it up to the center and then gently crease. Do this to each remaining corner.
Now take a corner and fold it up to the top cease across from it. Do this to each remaining corner. Isn't it fun folding paper? 
Up to this point, this is what your paper should look like. A quilt pattern. Now take a corner and fold it up to the closest fold. Do the remaining corners the same way and remember to gently crease your folds.
Hold your paper up so it looks like a diamond. Do you see the four little blocks that make a square in the center? Good...that is the size your box is going to be and the guide to making your cuts. If you look closely you can see where I made my marks to cut.
 You want to cut up the sides to the square in the center...remember don't cut past the corners of your square. Do this on the opposite side as well. Just the two sides across from each other. Do not cut the other two opposite sides...ppplease!!
This is what you should have....oh yes...turn the paper around so that the arrow is pointing to you. That was another observation made by the Chazman..such an observant kiddo...now if we can just work on his selective male hearing....LOL!!!
Now take the paper and fold it up to the square box in the middle. Then take the next fold and fold it over the top of the first fold. The tiny fold at the point will be inside the bottom of your box.
This is what it should look like at this point.
Take the pieces sticking out and fold them to the inside of the square. This is how it should look. Do the opposite side the same way. Then take the short sides and fold them over to the center the same way.
This is what it should look like after the first short side is folded in.
  TaDa......you made a box..
         well the top of one and I'm so soo proud of you.                                                                                  
The folds will hold themselves in but if you want you can take your pin and turn the box on it's side and crease the folds a bit more.
To make the bottom of your box you follow the same steps with this one exception. You need to make it a bit smaller than the top so they will fit together. Take your square and fold one corner into the opposite but instead of meeting them corner to corner you will need to pull it back a few centimeters, then crease fold.
Now take and cut off the overlaying sides of the triangle and follow the steps you did to make the top of your box.
Here is your box...all completely put together.
(Purple and Blue papers.. Reminds me it's getting close to Mardi Gras time)

Now you can embellish your new little box however you want to. I hope this tutorial was simple and easy to follow. If you have any questions, please feel free to ask away. ^_^

Remember in the beginning, I told you that you could use scrap paper for your box because it could be covered in scrap fabric. Well, here is one of my little boxes covered in fabric.
Keep in mind if you do plan on covering yours in fabric to take into consideration that the bottom will have to be a bit smaller than you would normally make it so that it will open and close easily with the extra bulk of the fabric.

Making a box can be used not only for this time of year but for Valentines, Easter, Halloween or just for a special birthday. Now....go make a box....and have FUN!!! I would love to see what you make...if you decide to do one.

Until next time.....HUGS, Regi